Part 6:Human in the Loop
When an expenses approval is escalated, it needs to be reviewed by a manager. In this section an Expenses Review application will be built to the Employee Expense request can be reviewed
6.1 Creating your knowledge base
To create a new knowledge base click on the green + icon on the bottom right side of the page.
- Select the template: "General knowledge base". If you do not have any other templates, you wont see this option
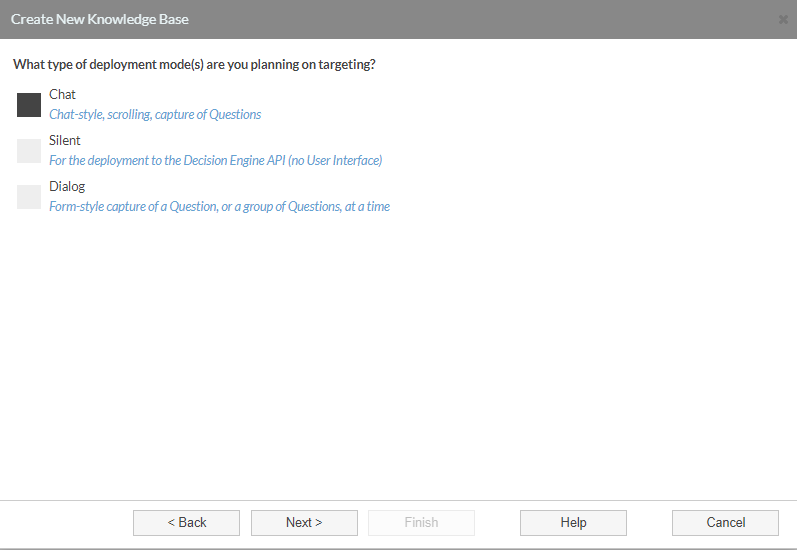
- Select the deployment mode: "Chat"
- Enter the new knowledge base name: "Expense Request Review"
6.2 Import Objects from Process Expense Application
- Open the Library Category in Build Tools and double-click "Add an Object Shortcut"
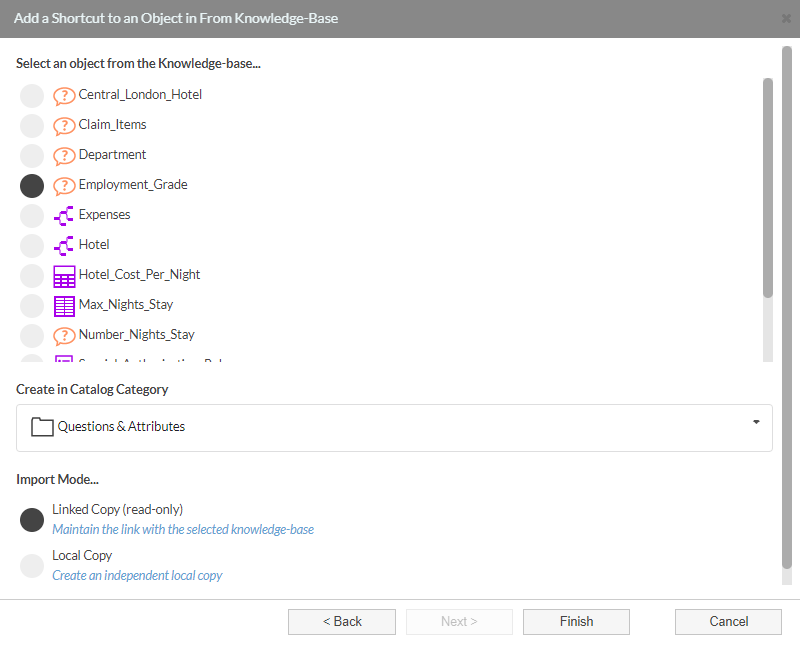
- Follow the instructions on each page to import an Object
- Select knowledge base "Process Expenses"
- Select Object: "Employment_Grade"
- Select Category: "Questions & Attributes"
- Import Mode: "Linked Copy (read-only)"
6.2.1 Repeat for the following Objects
- Go to Recently Used Category in Builds Tools and repeat the process for the following Objects
- Department
- Total_Hotel_Cost
- Number_Nights_Stay
- Central_London_Hotel
- Claim_Items
6.2.2 Repeat for the Objects from Employee Expense Request
- Go to Recently Used Category in Builds Tools and repeat the process for the following Objects
- Name
- SolutionID
6.3 Build Main Decision Flow
This application will be called by passing a Task ID in the URL, the task itself will contain the Case ID that can be retrieved using a build tool and then the payload can be retrieved using that Case ID.
From within the Main_Decision_Flow Tree editor:
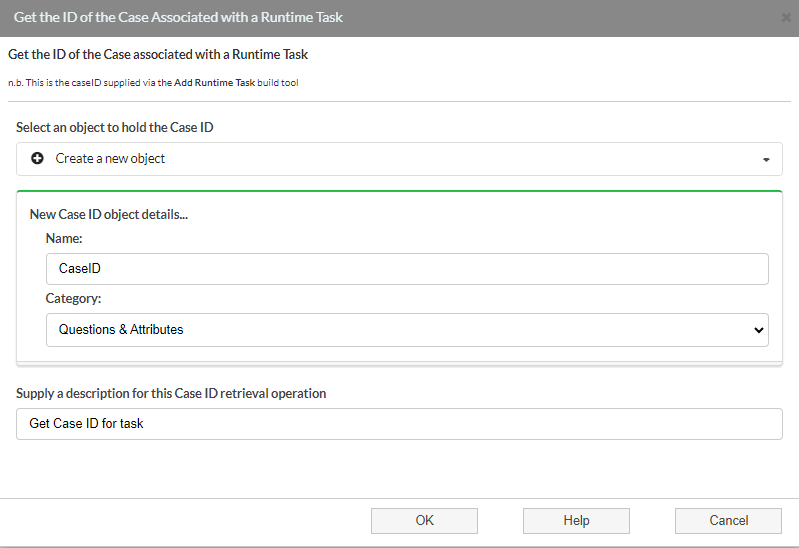
- Drag in the "Get Runtime Task Case ID" Build tool onto the Done Node. The build tool can be found in the Case Management category. All case related build tools mentioned in this section can be found in the same category.
- Select Create New Object
- Name: "CaseID"
- Category: "Question & Attributes"
- Description: "Get Case ID for task" (this is what will be displayed in the Decision Flow Tree)
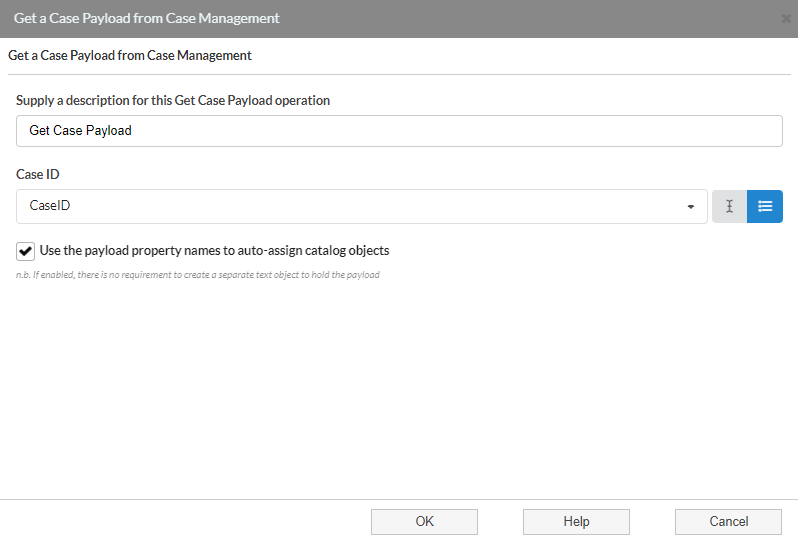
- Drag in the "Get Case Payload" Build tool onto the Done Node
- Name: "Get Case Payload"
- Case ID: select "CaseID"
- Check the payload property check box to automatically map payload entries to existing objects
-
Right-click on the "Done" node on the Main_Decision_Flow Tree editor (or click on the burger menu next to Done) and select Add a New User Interface Object... then Add a Report
-
Follow the instructions on each page to complete the process of creating a new Report object:
- Enter Name: "Expenses_Report"
- Description: ""
- Select Category: "Dialogs & Reports"
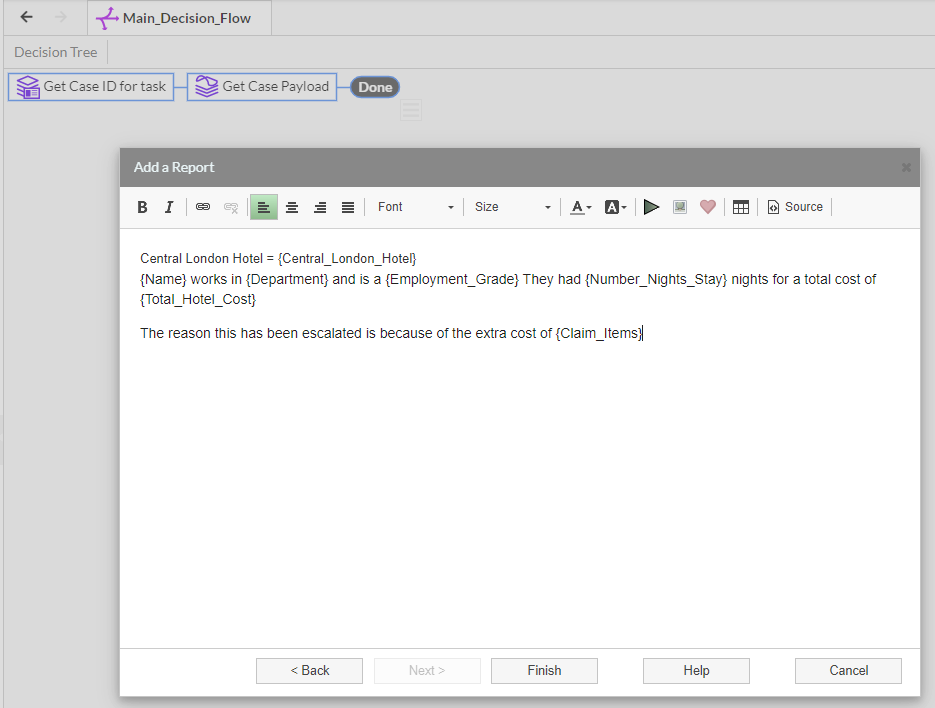
- Enter Text: " Central London Hotel = {Central_London_Hotel}
{Name} works in {Department} and is a {Employment_Grade} They had {Number_Nights_Stay} nights for a total cost of {Total_Hotel_Cost}
The reason this has been escalated is because of the extra cost of {Claim_Items}"
- Right-click on the "Done" leaf node** at the end of the branch and Add a New Question:
- Follow the instructions on each page to complete the process of creating a new Question object:
- Name: "Approve"
- Description: "Would you like to Approve or Reject the Expenses claim?"
- Category: "Questions & Attributes"
- Type: List
- Values: "Approved", "Rejected"
- Multi-select: leave unchecked
- Type of split: "Multi-way Split"
Right-click on the "Empty" leaf node at the end of the Reject branch and Add a New Question:
- Follow the instructions on each page to complete the process of creating a new Question object:
- Name: "Reason_For_Rejection"
- Description: "Please add your reason for rejection"
- Category: "Questions & Attributes"
- Type: Text
- Type of split: "No Split"
6.4 Update Case Payload
To capture the Managers response in the Case, the payload needs to be updated. If an attribute already exists, it will be overwritten, if not, it will be added to the Case.
- On the Approved branch of "Approve" Drag on the Update Case Payload Build Tool
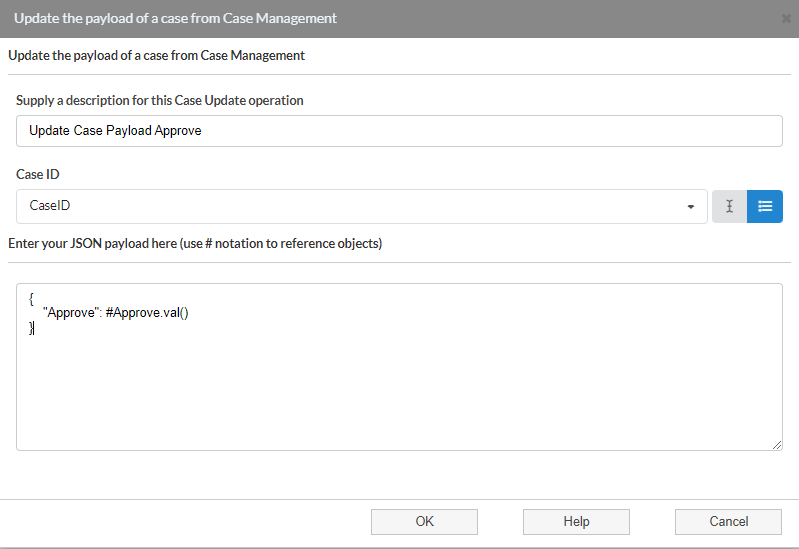
- Name: "Update Case Payload Approve"
- Case ID: "CaseID"
- Payload: " { "Approve": #Approve.val() }"
- After "Reason_For_Rejection" Drag on the Update Case Payload Build Tool
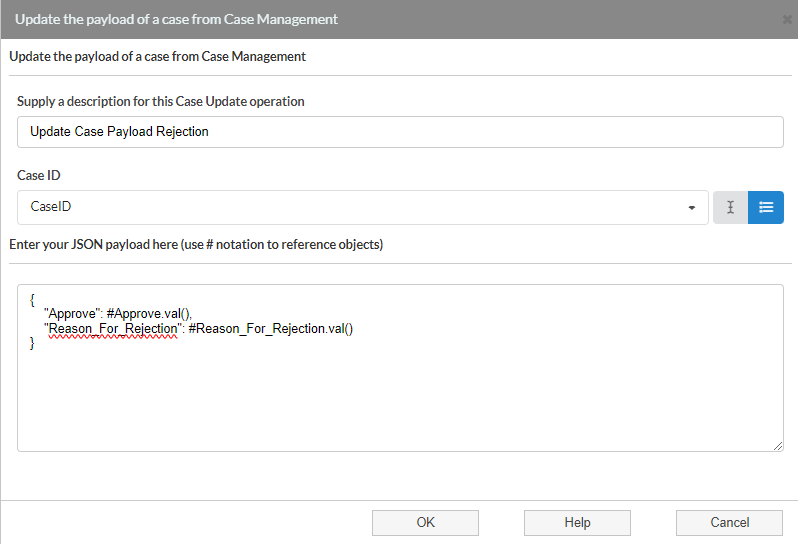
- Name: "Update Case Payload Rejection"
- Case ID: "CaseID"
- Payload: " { "Approve": #Approve.val(), "Reason_For_Rejection": #Reason_For_Rejection.val() }"
6.5 Set Case Status
- After the updated payload on the Approved branch of "Approve" Drag on the Set Case Status Build Tool
- Name: "Set Case Status to Approved"
- Case ID: "CaseID"
- New Status: "Approved"
- After the updated payload On the Rejected branch of "Reject" Drag on the Set Case Status Build Tool
- Name: "Set Case Status to Rejected"
- Case ID: "CaseID"
- New Status: "Rejected"
- Set Empty node to "Done" and Save the application.
This completes the building of the Expense Request Review application and note that no inputs or outputs are required as it's all managed through the case.

6.6 Deploying the chat application
This application also requires deploying so that a task can be created each time a Manager has to approve. Tasks are used as they can sit in a queue to be processed as and when
- Click the Rocket icon on the top right of the editor
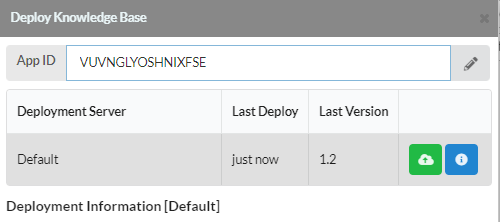
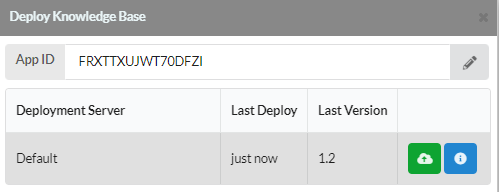
- Click the green icon to deploy and an app ID will be created
- Take note of the Application ID as this will be used from within the Process Expense Application.
6.7 Creating the Runtime Task
For a manager to approve or reject an application there needs to be a task created if a case has been escalated, all other requests will be automatically approved or rejected. Therefore a Task needs to be created in the Process Expenses application.
- Open the Process Expenses application
- Open the Process_Case Decision Flow tree in the Process Expenses application
- After the Set Case to Escalated Object, drag on the Add Runtime Task Build Tool from the Case Management category
- Select the Expense Request Review application from the Dropdown
- Title: "Escalated Approval"
- Task Timeout: "60"
- Case ID: "CaseID"
- Save the application
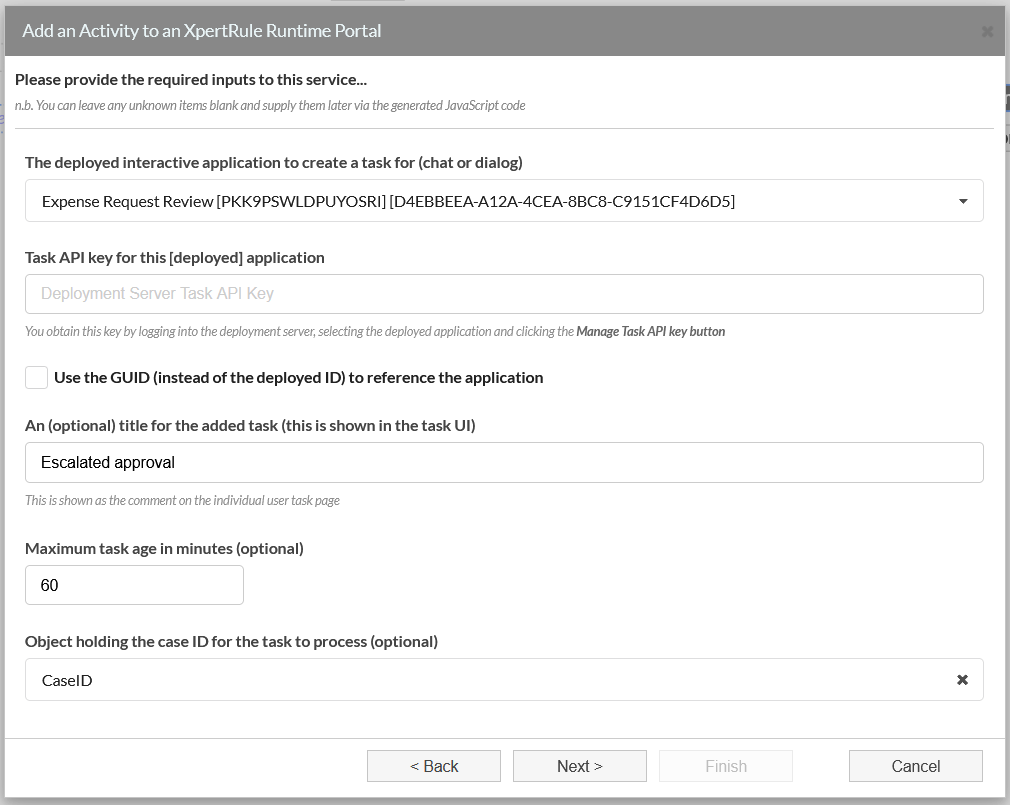 If adding an email address to the task through the green "+" icon, only this user will see the task on the task management tab.
6.7.1 Workflow Suspend
When a task has been created, on completion of that task, there is a call back to return back to the original application that created the task. The application will be resumed from this point. It could be possible that there is no need to return back to the application, but it is common to do so and in this application further objects will be added after the workflow resume.
- After the "Create runtime Task", drag on the Add Workflow Suspend Build Tool
- Title: "Workflow_Suspend"
- Maximum Time allowed: "1440" (1 day in minutes)
- Objects returned: "CaseID"
- Split: "Multi-way"
- Ensure all empty nodes are set to "Done"
- Save the application
Now once the manager has reviewed the Expenses request and that task is completed, this application will resume from this point.
6.8 Redeploy and Test
6.8.1 Redeploy
To Test the full solution from Employee Request to Process Case and Expense Request Review, Test run can be used in the initial request to generate a case, but the deployed versions are tied in through application ID's, therefore each time they are tested those final two applications will have to be redeployed. The Expense Request Review application hasn't changed since last deployment so it is only the Process Expenses application that needs to be saved and redeployed prior to test.
- Click the Rocket icon on the top right of the editor
- Click the green icon to redeploy and the application will be redeployed over the existing application
6.8.2 Test Solution
- Open Employee Expense Request
- Press F9 or click the Test Run button.
- You should now see the Dialog and populate with the following values
- Your name
- Your email address
- Department: "Sales & Marketing"
- Employment Grade : "Senior Manager"
- Number of Nights stay: "2"
- Total hotel cost: "150"
- Central London: "No"
- Claim items: "Food"
- Click Next to create the case
- Close this tab and go to the Deployment Server and refresh the Case Tab to see the new case
- Wait over a minute and refresh the Case Tab again, the status should have changed to Escalated
- As the case is escalated a new task will have been created, go the the task tab and refresh
- Click on the task and click on the URL in the task to execute the Chat application with that task ID.
- Reject the Expense request and provide a reason, then close the application
- Refresh the Task tab and see the task is completed
- Click on the Case tab, refresh the tab and note the case status should have changed to Rejected
- Open the case and note the payload has been updated with the reason for rejection also.
You have successfully tested the workflow application from end to end